
Export and assets / USER GUIDE
Exporting images
Exporting versus saving a scene
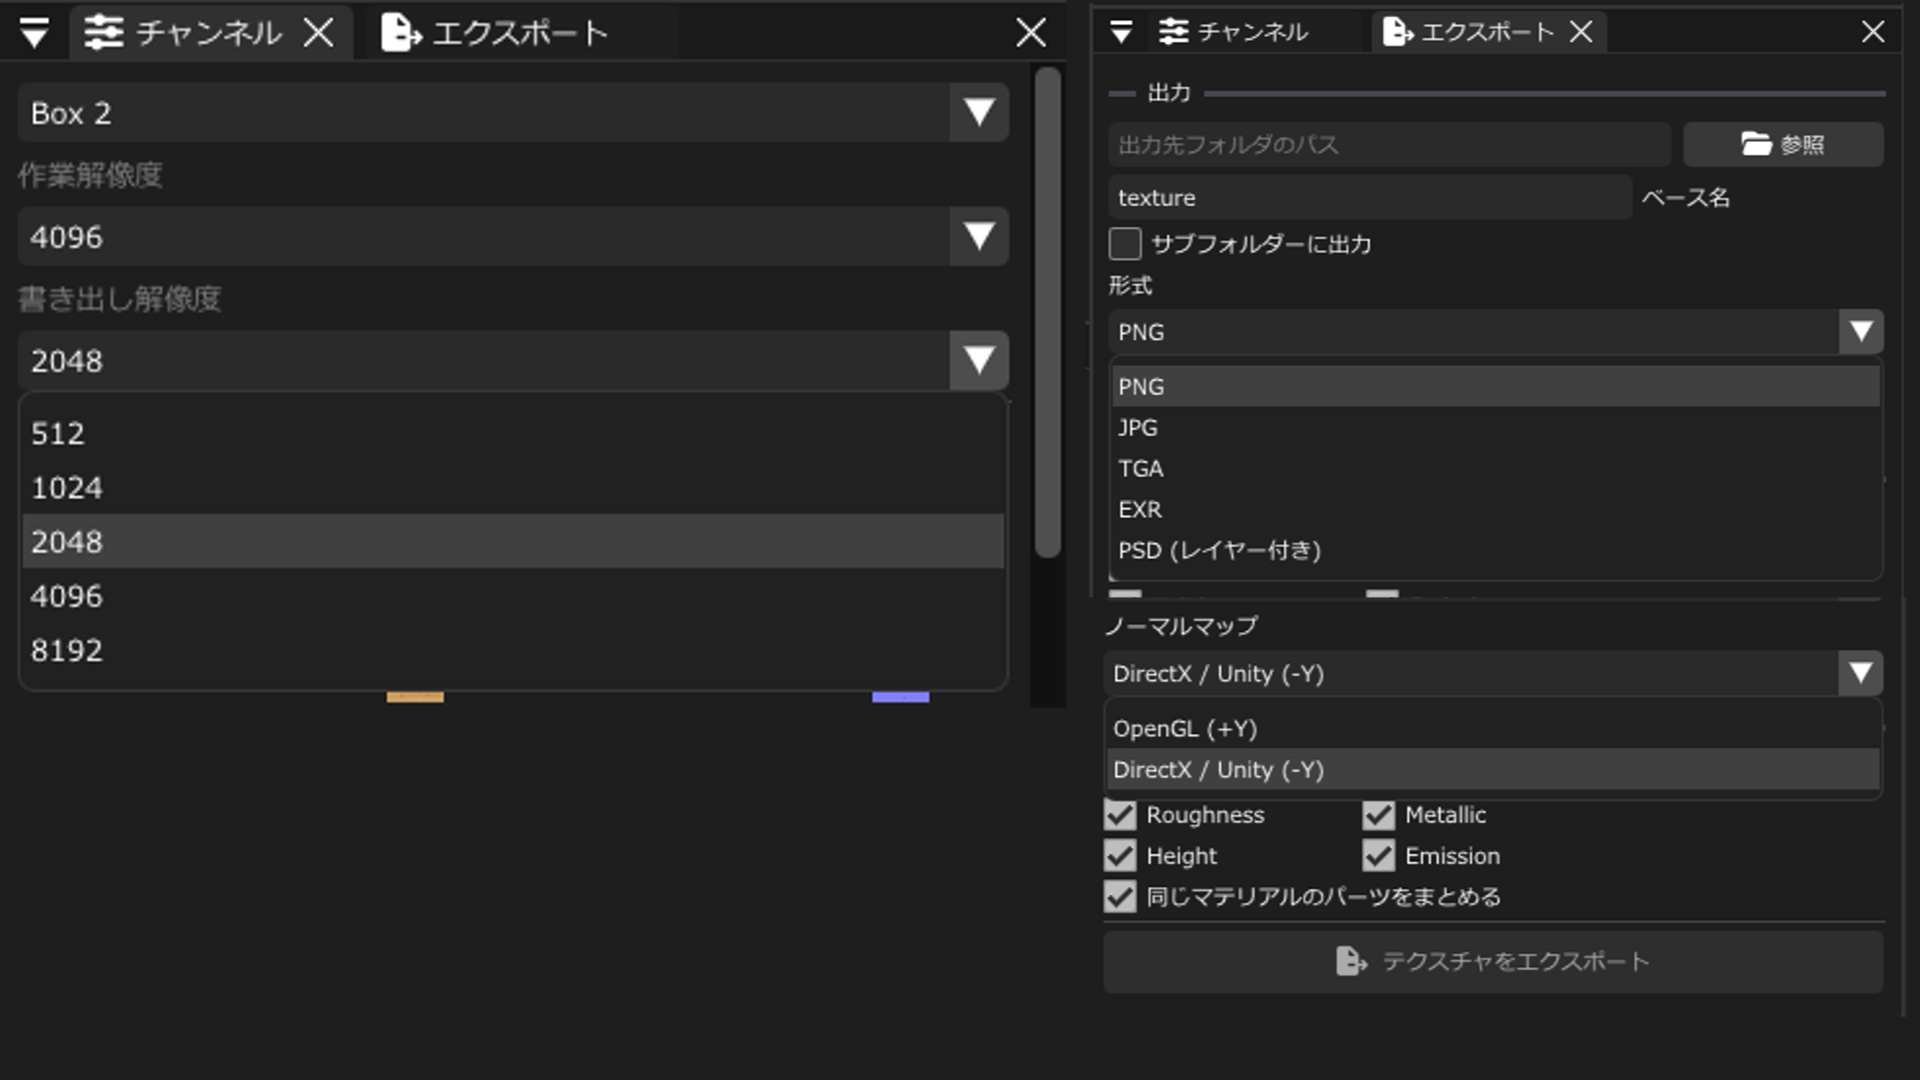
Choose the output location and format in the Export panel, and set Export Resolution in the Channels panel. Supported formats include PNG, JPG, TGA, EXR, and PSD. Saving a scene so you can resume editing and exporting finished textures as images are separate operations.
To export only geometry maps, use PNG export in the mesh map baking window. These maps contain linear data. A new folder is created at the output location.
Texture export from the Export panel requires the Full edition. In the Trial, save the scene and open it in the Full edition to export.
Output settings
- Choose the export resolution in Channels.
- In Export, specify the output folder, base name, and format.
- Enable the channels you need and choose the normal map convention.
- Existing files with the same output names are overwritten without a confirmation dialog. Change the output folder or base name to keep an earlier export. Export into a subfolder creates a folder named after the base name inside the chosen output folder.
- Click Export Textures.
| Setting | When to use it |
|---|---|
| PNG | The standard choice for saving images without quality loss |
| JPG | Use for smaller color images. Because it uses lossy compression, choose PNG or another suitable format for data maps |
| TGA | Use when the destination workflow requires TGA |
| EXR | Use for workflows that support EXR. Changing the format alone does not increase the precision of the original editing data |
| PSD | One file per enabled channel in each output texture set, with raster layers and editable opacity/blend settings. Save .harmos too for editable HarmoFlow strokes and adjustment parameters. See the details below |
| OpenGL / DirectX | Choose the green-channel orientation of tangent-space Normal maps to match the destination's settings |
JPG does not preserve transparency. Use PNG or another suitable format when you need transparent pixels.
Unpainted areas and transparency in PNG
In Ver.0.1.2, PNG export excludes the Base background added automatically for display. Unpainted areas are transparent, and the output reflects semitransparent painting, masks, and layer opacity.
Imported textures and Fill layers you add yourself are still included in PNG output. When checking a PNG background, distinguish these exported contents from the automatic display-only Base.
Also check “Pixels outside mesh UVs” below for the separate settings that restore the source texture outside UVs, make those areas transparent, or keep the full texture.
What PSD retains
A separate PSD is created for each enabled channel in each output texture set. Paint, Fill, and path layers are saved as image layers with their original names, order, and visibility. Opacity and blend modes (Normal, Multiply, Add, and Overlay) remain editable PSD settings. Add maps to Linear Dodge (Add).
When editable mask preservation is off, masks and clipping are baked into pixel transparency. Folders retain their hierarchy, names, visibility, and collapsed state, using Pass Through blending. For ordinary Paint, Fill, and Path channel compositing, no extra layer is added solely to compensate for compositing differences.
Results from generated normals, normal-map UV seam processing, and three-dimensional height effects are saved in separate layers as needed. Save the Scene as well if you want to edit the original strokes or settings later.
Adjustment layers in PSD
Adjustment layers are exported as raster image layers for their target channels. HarmoFlow's adjustment parameters are not preserved as native Photoshop adjustment layers. Save the .harmos scene too if you want to edit those values later.
The exported adjustment image depends on the composited layers below its position. Changing those underlying layers in the PSD does not automatically recalculate HarmoFlow's adjustment.
Masks and clipping in PSD
When you select PSD, you can independently enable Keep editable clipping masks and Keep editable layer masks. Both are off by default, which bakes their effects into layer pixels. Enable them to retain separate clipping settings or layer masks for editing in Photoshop. These options affect PSD only and are retained when you save the scene.
Photoshop can composite translucent edges and consecutive clipping differently. Leave preservation off when the baked appearance matters most. Enable it when you need to edit masks later, then check the exported PSD.
Merge parts for export
Export is not limited to the part currently selected in the Channels panel. It creates files for the enabled channels in each output texture set. When parts sharing a material are merged into a PSD, their individual layers may be organized into mesh-named folders.
Image and PSD exports create a file for each output texture set and enabled channel. Merge parts sharing a material is enabled by default. It combines the UV regions of parts assigned to the same material in the original model into one texture set for export, while keeping different materials separate. Where UVs overlap, painting from the first part takes priority. If you have painted different images on overlapping UVs, turn this setting off to export each part separately.
Pixels outside mesh UVs
In Preferences → VRAM → Textures → Outside mesh UVs, choose to fill with the original texture, make the area transparent, or keep the entire texture. Storage-mode changes take effect on the next model import or resolution change.
Transparent export also works without sparse-GPU support. Original-texture filling applies to ordinary exports and to the background and merged image in layered PSD files.