
Display and surface properties / USER GUIDE
Inspecting baked geometry maps
Inspect mesh maps
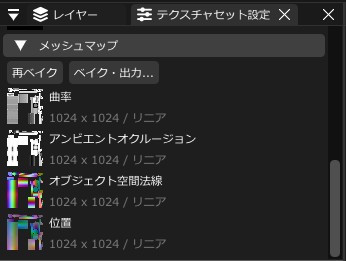
Automatically generated maps appear in the Mesh Maps list in Texture Set Settings. Click a thumbnail to enlarge it, or use Show in UV Editor to use it as the background.
How to read the four map types
| Map | How to read it |
|---|---|
| Curvature | White is convex, gray is flat, and black is concave |
| Ambient Occlusion (AO) | White means no occlusion. Darker areas are more occluded |
| Object-Space Normal | RGB represents surface directions within the model. This serves a different purpose from the Normal channel |
| Position | RGB represents positions within the bounds of the entire model |
Baking resolution and supported features
Automatic baking uses 1024px per texture set. Use Rebake to update the maps. The manual-export resolution does not apply to automatic baking.
- Open File → Bake Mesh Maps... and select Texture set index and Resolution. Choose a resolution of 256 / 512 / 1024 / 2048px.
- Click Bake mesh maps and wait for completion.
- Check the displayed texture set and image size before choosing “Export four PNG maps...”.
Changing Resolution alone does not replace the displayed automatic bake.
Current supported features
This is self-baking based on all parts of the current model. AO uses 64 hemisphere rays with a maximum distance of 15% of the model's diagonal length. Curvature is calculated from face angles and distance from edges.
Baking covers UV coordinates from 0–1. Overlapping UVs within a single texture set share the first face's result. High-poly projection, cages, UDIM, and baking of ID, thickness, and Bent Normal maps are not supported.
Manual baking and PNG output
You can also open manual baking from Texture Set Settings → Bake / Export. Use “Use automatic bake (1024px)” to return to the automatic result. The four linear-data PNGs are curvature.png, ao.png, object_normal.png, and position.png, written into a new folder without overwriting earlier output. If the dialog warns that the mesh changed, rebake before exporting the current shape.