
Export and assets / USER GUIDE
Finding and importing assets
Search and filter assets
The Asset Browser shows assets in your working folder and shared material presets. Filter by asset type (images, meshes, or materials), folder, search terms, or favorites, and save your search criteria. Use Saved searches and Filter by path at the bottom to show or hide those filter columns. Their filters remain active when hidden; the text-search field at the top stays visible. If you cannot find an asset, reset the filters.
Before applying a material, select the target texture set. When you start a new painted material from the Asset Browser, it is recorded in the currently selected texture set. Painting on an existing layer targets the set that owns that layer. Parts using the same material can share their final texture, so overlapping UVs can show changes on another part.
Save search conditions
Saved searches retain the text, type, library, folder and favorites filters together. Saving under the same name updates the criteria; remove an unwanted saved search from its context menu. Changing a filter manually clears the saved-search selection. After adding or restoring files outside the app, use the top Refresh button to rescan the list.
Prepare library materials for offline use
Materials with a download badge fetch their images on first use. Before going offline, right-click them and choose Download for offline use. Later uses reuse the cache. See download status, retries, and cache removal. Uninstalling the cache keeps project images and the material's library entry.
Import and use assets
Add assets with Import File... or by dragging them in from your operating system. Import Unity Package imports assets contained in a Unity Package. It does not run Unity Editor features or scripts. Right-click an asset to add it to favorites or show it in File Explorer. Use images in channels, image fills, or stamps as needed.
Register an image as a stamp or brush
Right-click an image in the project and choose Register as Image Stamp or Register as Brush Tip. The first opens the Image tab in Stamps; the second opens the Brush panel. Import PNG Brush and the existing image-add/drop workflows are still available.
Organize folders and files
Choose New Folder from the add menu, a folder's context menu, or an empty area's context menu. Enter its name after creation. To rename an existing file or folder, select it and press F2 or choose Rename. Press Enter or click outside the field to commit; press Esc to cancel. Renaming cannot overwrite a different file in the same location.
Choose Delete, or press Delete while the Asset Browser has focus, to move the selected item to the Windows Recycle Bin without the usual confirmation dialog. Deleting a folder includes its contents. This is separate from scene Undo. To recover it, restore it to its original location from the Recycle Bin, then click Refresh in the Asset Browser.
Deleting a model or image that the scene uses can leave a missing reference. Deleting project files is separate from Uninstall material data... for library materials.
A location that cannot use the Recycle Bin may show a Windows warning or error. Check the item and its location before deleting it.
Import a Unity Package
A Unity Package (.unitypackage) can be expanded into the project's asset library. Importing the package does not replace the model in the viewport. Choose the model you want from the extracted assets afterward.
- ImportChoose a .unitypackage and extract it into the library
- ChooseFind a supported model such as FBX in the imported folder
- InspectOpen the model and check textures and display
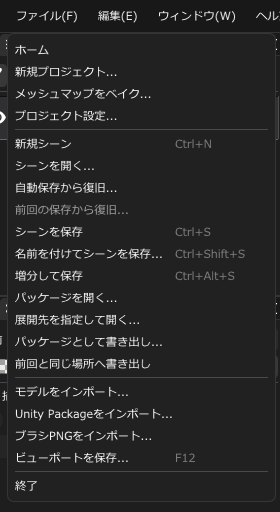
- Choose File → Import Unity Package... and select a .unitypackage. You can also use the Asset Browser's add menu or drop the package in from your operating system.
- Find the extracted folders in the Asset Browser. Clear search, type, or folder filters if the assets are missing from the list.
- Drag the desired FBX or other supported model from the Asset Browser into the viewport. You can also choose an individual file with File → Import Model....
- Assign the required images to channels or material layers and inspect the result.
- For unsaved work, save to a project folder to retain the imported assets. See Saving projects.
Contents and limitations
- Extraction preserves the package's asset folders and related files. The model picker supports FBX, OBJ, glTF, GLB, DAE, PLY, STL, 3DS, and Blend. Supporting a format does not mean every feature of a file is reproduced.
- Images, material definitions, and related files such as .meta files remain in the extracted assets. Having those files available does not automatically apply Unity material settings. Check image assignments and target channels.
- Automatic Prefab import is currently disabled. Extract the package and choose an FBX or another supported model. This workflow does not execute Unity scenes, scripts, Animator behavior, or custom shaders, and it does not guarantee an exact match with Unity's rendering.
- Files at the same relative path may be overwritten. Keep a copy of the project before reimporting or combining packages, and use a separate project when you need to check for conflicts.
If no model appears, check that you selected a model after importing the package. If colors or patterns are missing, check that the images are included and assigned to the correct texture set and channel. For morph controls, see FBX shape-key import.