
Display and surface properties / USER GUIDE
Viewport, meshes, and display
Move the camera
By default, rotate with Alt+left drag and pan with middle-button drag or Space+left drag. Zoom with the mouse wheel, Alt+right drag, or Ctrl+left drag; drag right or up to zoom in. Panning is unavailable in Pivot 360. If you have customized Key Config, check your current bindings.
Use Front to return to the front view. In Free Orbit, panning moves the rotation center. Use Shot or F12 to save the viewport as a PNG.
Use Layer Focus at the top of the viewport to move the camera toward the selected layer's painted area. Focus uses the strokes of a paint layer and the shape of a path layer. For material and adjustment layers, it uses mask strokes when an enabled mask contains them; otherwise it uses the target mesh's bounds. Selecting another layer while focused moves the view to that layer. Use Whole to show the entire model. Empty paint and path layers cannot be focused.
Axis views and the floor grid
Click X, Y, Z, or a negative axis in the top-right navigation widget to face that direction while keeping the current target and distance. Drag the widget to orbit. Use Toggle Floor Grid in the left tool strip or pie menu to show or hide the floor grid.
Switch layers close to your painting
In Ver.0.1.2, hold the right mouse button over the 3D viewport, slide into Layers in the pie menu, and release over a card in the thumbnail list to select a layer. Controls beside the card also let you change settings such as visibility and locking. The same interaction works in the UV Editor.
Selecting a Path layer switches to the Path tool. Selecting a Paint layer switches to the brush, while retaining Color blending / Blur, UV Shell Fill, or Polygon Fill if that mode is already in use. See the layer pie menu for pen controls and which settings are available.
Switch display modes
The display menu includes PBR, NPR, individual views of the six channels, and layer masks. Choose the channel appropriate to your task, such as BaseColor for checking color or Roughness for its distribution. Use PBR to inspect surface properties with light reflections, and NPR to check a toon-style appearance. These views do not guarantee an exact match with external shaders.
Shading controls lighting direction, strength and color, environment lighting, highlights, exposure, and normal strength in both PBR and NPR. Env Saturation is stored separately for the two modes: its default is 0 for PBR and 1 for NPR. ACES Tone Map applies only to PBR. In NPR, Light Min, Light Max, and Reflectance (F0) apply to painted materials; imported lilToon materials use their own values. Reset Shading Settings restores the defaults for both modes.
The current NPR preview does not render lilToon outlines.
Wire Settings controls visibility, back-face display, color, opacity, line width, and whether to hide the diagonals of detected quads. These settings are separate from the UV Editor's wireframe settings.
Select and hide parts
Click a part with the Selection tool. Hold Shift to add or remove parts, drag from an empty area for rectangular selection, and press Esc to clear the selection. Show or hide selected parts from the tool options. The Mesh panel lists part names, materials, and triangle counts, with individual visibility controls as well as Show All and Hide All.
Open the panel and toggle visibility
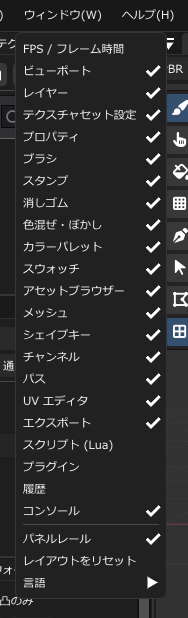
Open Window → Meshes. Each row's Show checkbox controls that part's visibility. Clicking its name selects it; selection and visibility are separate controls.
- Clear Show for a part you want to hide. Temporarily hiding hair or clothing can help you inspect the surfaces behind it.
- Select the same checkbox to restore the part. Use Show All if you lose track of what is hidden.
- For several parts, select them with the Selection tool or in the mesh list, then use Hide Selected or Show Selected in the tool options. By default, Shift+click adds or removes a selection and Esc clears it.
Hiding a part does not delete it. Visibility is saved with the scene, and closing the Meshes panel is a separate action. Do not rely on visibility alone to exclude parts from texture export. Before exporting, show the intended parts, check the target sets and channels, and inspect the output images.
Inspect shape keys
Import shape keys from FBX
Shape keys, also called blend shapes, are expressions or shape changes stored in a model. Import an FBX exported with its blend shapes included through File → Import Model..., then open Window → Shape Keys. For a Unity Package, extract the package first and select its FBX.
Model-format support and shape-key support are different. Use FBX for shape-key import. Support for loading glTF, GLB, or Blend geometry does not guarantee that their morph data will appear in this panel.
Weights and filters
- Filter by mesh or search by name to find a key. Active only shows keys whose weight is greater than 0.0001.
- Adjust Weight from 0–1. Zero means no deformation from that key; 1 means its full effect. You can use several keys together, so inspect their combined result.
- The top-level Zero Active sets every key whose weight is greater than 0.0001 to zero, regardless of the current list filters. Reset All restores the imported defaults, which are not necessarily all zero.
Each group also has Reset and Zero Active. These affect the keys in that group that pass the current filters. Use the top-level Reset All to restore every key. Weights are stored in the scene.
If keys are missing
If the panel says No shape keys in the loaded model, check that the source model has blend shapes and that the FBX export included them. Settings stored only in a Unity Prefab are not imported by the currently disabled automatic Prefab workflow. If keys exist but are missing from the list, clear the mesh, name, and Active only filters.
Texture image export does not export the model's expressions or weights as model data. Save the scene for continued work and use texture export for the finished images.